What is Nextcloud?
What Nextcloud is not!
Benefits and comparison
Who it is for?
- If you work in a profession that you generate a lot of data.
- if you live in a different part of the world than the actual country you came from that you have to move from place to place. (like me)
- If you have to constantly make the data you generate available with your partners in a remote location.
- If you want to share photographs, home videos, or music with your distributed family.
- Single board computer enthusiasts wanting to learn more and make the best use case of investment.
What you need to setup self hosted nextcloud?
Hardware
- Raspberry Pi 3/4 (4GB or above)
or any Single board computer(sbc) (5-12 volt) you can keep up online that you do not waste electricity bill. Since I have much different make sbc, so I decided to go with a multi-node cluster, but you can do it on a Virtual Machine on a Windows laptop too. I am using a Raspberry Pi 3 and Raspberry Pi 4 on a remote site i.e. back home in India. The reason I suggest raspberry pi is because it is arm64 architecture, it has a large user base, and above all, it's Made in the UK. - Storage of 1TB SSD or HDD (more the merrier)
- I am using a 1 TB NVMe SSD here in London. And a 1TB standard HDD in India.
-
Ethernet Cables CAT 7 should be sufficient.
I do not recommend connecting your pi to the router over wifi. - USB to MicroSD card Adapter
Software
- Ubuntu Operating System
- Apache2
- Php7.*
- MySQL/Mariadb
- ProxySQL (for load balancing Galera Cluster)
- Syncthing (for copying data to other site and high availability)
- CoreDNS (for DNS Service at home network)
- Haproxy (for load balancing Redis and Apache2)
- Redis (to manage file locking and php session sharing)
- OpenVPN
- Latest Version of Nextcloud
Prepare your first Node
sudo apt update
Then proceed upgrading your ubuntu.
sudo apt upgrade -y
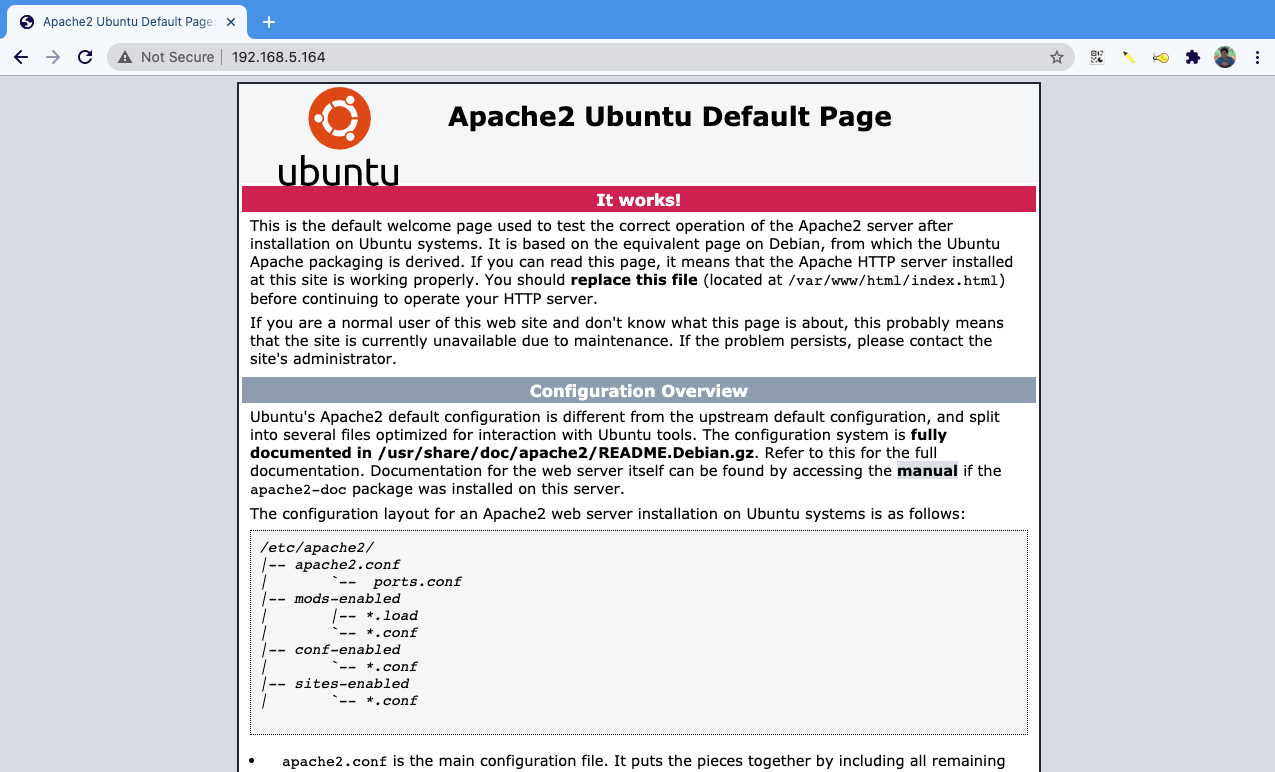
Install Web Server
sudo apt install apache2 -y
sudo ufw allow 80/tcp
https://nextcloud.com/install/#instructions-server
Once that download completes, unzip the file with the command:
unzip nextcloud-20.0.1.zip
sudo mv nextcloud /var/www/html/
sudo chown -R www-data:www-data /var/www/html/nextcloud
Now Lets configure Apache
sudo nano /etc/apache2/sites-available/nextcloud.conf
Alias /nextcloud "/var/www/html/nextcloud/"
<Directory /var/www/html/nextcloud/>
    Options +FollowSymlinks
    AllowOverride All
      <IfModule mod_dav.c>
        Dav off
      </IfModule>

     SetEnv HOME /var/www/html/nextcloud
    SetEnv HTTP_HOME /var/www/html/nextcloud
</Directory>
Note, I setup nextcloud on my.cloud.com/nextcloud and not directly on my.cloud.com. This is as I wanted to put something else on web root.
Save and close the file. Enable the new site with the command:
sudo a2ensite nextcloud
sudo a2enmod rewrite headers env dir mime expires
<IfModule mod_expires.c>
  ExpiresActive On

  # Images
  ExpiresByType image/jpeg "access plus 1 year"
  ExpiresByType image/gif "access plus 1 year"
  ExpiresByType image/png "access plus 1 year"
  ExpiresByType image/webp "access plus 1 year"
  ExpiresByType image/svg+xml "access plus 1 year"
  ExpiresByType image/x-icon "access plus 1 year"

  # Video
  ExpiresByType video/mp4 "access plus 1 year"
  ExpiresByType video/mpeg "access plus 1 year"

  # CSS, JavaScript
  ExpiresByType text/css "access plus 1 month"
  ExpiresByType text/javascript "access plus 1 month"
  ExpiresByType application/javascript "access plus 1 month"

  # Others
  ExpiresByType application/pdf "access plus 1 month"
  ExpiresByType application/x-shockwave-flash "access plus 1 month"
</IfModule>
Installing and configuring php
sudo apt install php7.4-fpm php7.4-common php7.4-mysql php7.4-xml php7.4-xmlrpc php7.4-curl php7.4-gd php7.4-imagick php7.4-cli php7.4-dev php7.4-imap php7.4-mbstring php7.4-soap php7.4-zip php7.4-bcmath php-apcu php-redis php7.4-dompdf -y
sudo sed -i '/^memory_limit =/s/=.*/= 512M/' /etc/php/7.4/apache2/php.ini
Installing and configure mariadb
sudo apt install mariadb-server -y
> systemctl status mariadb
mariadb.service - MariaDB 10.1.47 database server
   Loaded: loaded (/lib/systemd/system/mariadb.service; enabled; vendor preset:
   Active: active (running) since Wed 2020-12-23 15:26:57 GMT; 4h 21min ago
     Docs: man:mysqld(8)
           https://mariadb.com/kb/en/library/systemd/
  Process: 874 ExecStartPost=/bin/sh -c systemctl unset-environment _WSREP_START
  Process: 860 ExecStartPost=/etc/mysql/debian-start (code=exited, status=0/SUCC
  Process: 552 ExecStartPre=/bin/sh -c [ ! -e /usr/bin/galera_recovery ] && VAR=
  Process: 486 ExecStartPre=/bin/sh -c systemctl unset-environment _WSREP_START_
  Process: 440 ExecStartPre=/usr/bin/install -m 755 -o mysql -g root -d /var/run
 Main PID: 706 (mysqld)
   Status: "Taking your SQL requests now..."
After this run the command below for you ready to use.
sudo mysql_secure_installation
Log in to the MySQL prompt with the command:
sudo mysql -u root -p
Configure mysql/mariadb for Nextcloud
CREATE DATABASE nextcloud;
CREATE USER 'nextcloud'@'localhost' IDENTIFIED BY 'PASSWORD';
GRANT ALL PRIVILEGES ON nextcloud.* TO 'nextcloud'@'localhost';
ALTER USER 'userName'@'localhost' IDENTIFIED BY 'New-Password-Here';
Finish up the database with the following commands:
FLUSH PRIVILEGES;
exit
Finally, restart Apache with the command:
sudo systemctl restart apache2
Completing the first node Nextcloud installation
$ sudo blkid
/dev/nvme0n1p1: LABEL="nvme" UUID="01cc0de2-dec6-4544-b953-c7f51ce01220" TYPE="ext4" PARTUUID="590747a2-01"
$ sudo nano /etc/fstab

UUID="01cc0de2-dec6-4544-b953-c7f51ce01220"     /media/storage          ext4    data=journal
cd /media
sudo mkdir -p storage/data
sudo chown www-data:www-data -R /media/storage/data
Now our first node setup is complete.
Take a note of your raspberry pi's IP using the ifconfig command.
Let's assume your pi is connected to the router using the ethernet and the eth0 interface IP assigned is 192.168.0.2. In your router setting configure your raspberry pi with a static up address so that it never changes to a different IP address.
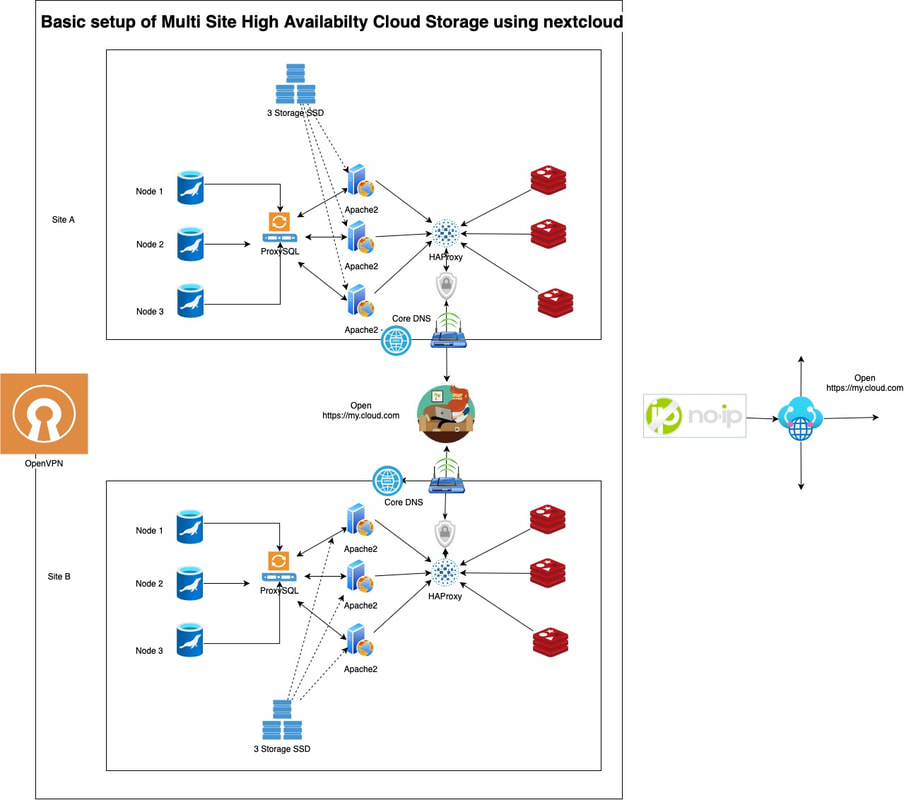
Let's first set up OpenVPN, it's super easy.
Method 1. Using Openvpn Server to access over wan.
curl -L https://install.pivpn.io | bash
Secondly, it will say if you are using static IP or not, depending on what you have you can choose but in case you do not have static IP then enter the domain name you registered (in our case its my.cloud.com)
pivpn add
Copy this file to your phone or another computer where you would need to install the OpenVPN client. Browse this file and enter the username password to connect. Now you can open nextcloud using your raspberry pi as if you are at home. Note: To be able to access nextcloud using the registered domain you need to add it to /var/www/html/nextloud/config/config.php trusted domain array. In our case, we add my.cloud.com.
Method 2: Port forward 443, to access over https://yourdomain.com
Enable SSL
Dry Run to check if everything is fine setup
sudo certbot certonly --dry-run --webroot --webroot-path "/usr/share/apache2/default-site/" --text -v --email your_email@example.com --agree-tos -d my.cloud.com
sudo certbot certonly --server https://acme-v02.api.letsencrypt.org/directory/ --webroot --webroot-path "/usr/share/apache2/default-site/" --text -v --email your_email@example.com --agree-tos -d my.cloud.com
# tree  /etc/letsencrypt/live/
/etc/letsencrypt/live/
├──README
└──my.cloud.com
    ├──README
    ├──cert.pem ->../../archive/my.cloud.com/cert1.pem
    ├──chain.pem ->../../archive/my.cloud.com/chain1.pem
    ├──fullchain.pem ->../../archive/my.cloud.com/fullchain1.pem
    └──privkey.pem ->../../archive/my.cloud.com/privkey1.pem
Finally the last step for single node nextcloud instance
sudo a2enmod ssl
sudo nano /etc/apache2/sites-available/nextcloud.conf
Save and quit, then enable the new configuration:
sudo a2ensite nextcloud.conf
Now restart Apache:</>
sudo service apache2 restart
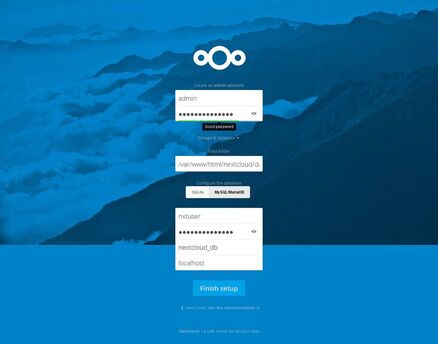
in your browser navigate to https://my.cloud.com/nextcloud and voila!
First step to multisite

Install DNS service on Site 1 Nodes 1 & 2 : CoreDNS
wget https://github.com/coredns/coredns/releases/download/v1.8.0/coredns_1.8.0_linux_arm64.tgz
Extract the coredns file and move it /usr/bin/ location.
tar -xvf coredns_1.8.0_linux_arm64.tgz
sudo mv coredns /usr/bin/
sudo chmod +x /usr/bin/coredns
And copy Corefile from my github account to /etc/coredns/. You would have to create coredns folder manually. Take a note of this line in the Corefile
192.168.0.2 my.cloud.com
Set CoreDNS IP on your router's LAN > Primary DNS Server IP, the secondary DNS server IP can be 8.8.8.8 or 1.1.1.1 i.e. either google or Cloudflare or any resolver of your choice.
Secondly on all your server node's /etc/resolv.conf set two lines of both the coredns server such as
nameserver 192.168.0.2
nameserver 192.168.0.3
Install Syncthing
wget https://github.com/syncthing/syncthing/releases/download/v1.12.0/syncthing-linux-arm64-v1.12.0.tar.gz
Extract syncthing binary and copy it var/www/htm/syncthing/
tar -xvf /syncthing-linux-arm64-v1.12.0.tar.gz
Change the permission on syncthing binary to executable
sudo chmod +x /var/www/html/syncthing/syncthing
Change the ownership of syncthing excutable to www-data
sudo chown www-data:www-data -R /var/www/html/syncthing/
We change the ownership to www-data because nextcloud web app itself and nextcloud data folder at /media/storage/data/. Now we install the systemd unit to /etc/systemd/system/
sudo systemctl enable [email protected]
sudo systemctl start [email protected]
To make the syncthing web interface accesible from other devices on the local netowrk you must update the syncthing config file located at /var/www/html/syncthing/.config/config.xml.
then locate the line that looks like this<address>127.0.0.1:8384</address>
0.0.0.0 and restart the service
sudo systemctl restart [email protected]
Now you can access the syncthing web interface from any computeron the local network.
We start the service but we do not setup data to be copied as we do not have other nodes up and running.
Install Redis
mkdir ~/tmp
cd ~/tmp
wget http://download.redis.io/redis-stable.tar.gz
tar -xvf redis-stable.tar.gz
cd redis-stable
make
make test
sudo make install
sudo mkdir -p /media/storage/var/opt/redis-stable/
I installed redis-stable on my mounted SSD, as read write from ssd is faster compared to memory card.
sudo cp ~/tmp/redis-stable/redis.conf /etc/redis
Redis configuration for Sentinel setup
Sentinel acts as a configuration provider or a source of authority for clients service discovery.
Furthermore, Sentinel is a robust distributed system, where multiple sentinels need to agree to about the fact a given master is no longer available. Then only the failover process starts a select a new MASTER node. This sentinel agreement is done according to the quorum value.
What is Quorum ?
Let’s get our hands dirty with Redis Sentinel.

(Go to src folder.)
cd src/ && redis-server ../redis.conf &
cd src/ && redis-server ../sentinel.conf — sentinel &
(Or else you can simply use cd utils && ./install_server.sh.)
You can either choose to set up supervised by systemd in the config or create a systemd unit under /etc/systemd/system/
node-1$ sudo netstat -ltnp | grep 6380
tcp        0      0 0.0.0.0:6380            0.0.0.0:*               LISTEN      15240/redis-server
tcp        0      0 0.0.0.0:26380           0.0.0.0:*               LISTEN      451/redis-server *:
if you get error netstat command not found. then you can run the command below to install them.
sudo apt install net-tools
Setting up Mariadb Galera Cluster
Initially, I set it up using Rsync Snapshot State Transfer but I quickly learned that using the rsync method halts the frontend clients while the wsrep state transfer is in progress. I re-setup the Galera cluster using Xtrabackup-v2 as the SST method.
On an important Note: Set the data directory to the path on your SSD to gain performance. otherwise nextcloud will be very slow.
Follow the link to my GitHub account to copy the galera configuration on each of these nodes to /etc/mysql/conf.d/galera.conf later (Do not start Galera cluster as of yet, put galera.conf on desktop temporarily). After you confirm that the Nextcloud instance has been copied to both the nodes. Do not forget to update the trusted domain array in config.php.
I have saved the full nextcloud config on my Github account which you can use as a reference.
sudo dd if=/dev/mmcblk0 of=~/sd-card-copy.img bs=4M
Do not forget to set slaveof in redis.conf node 2 and node 3 and server id in mariadb configuration.
sudo apt start openvpn@client
Setup the syncs between nodes and both Sites
Take a look at this link to an intro and how to setup syncs
Install and Configure ProxySQL Load Balancer for Mariadb
PS: I highly recommend don't waste your time and efforts on using clustercontrol it only looks fancy but later you would have to bear the pain. I would say it is only meant for large infrastructures. I quickly got rid of it.
cd ~/tmp
curl -OL https://github.com/sysown/proxysql/releases/download/v1.4.4/proxysql_1.4.4-ubuntu16_amd64.deb
sudo dpkg -i proxysql_*
Start ProxySQL Load Balancer
sudo systemctl start proxysql
● proxysql.service - LSB: High Performance Advanced Proxy for MySQL
   Loaded: loaded (/etc/init.d/proxysql; bad; vendor preset: enabled)
   Active: active (running) since Thu 2017-12-21 19:19:20 UTC; 5s ago
     Docs: man:systemd-sysv-generator(8)
  Process: 12350 ExecStart=/etc/init.d/proxysql start (code=exited, status=0/SUCCESS)
    Tasks: 23
   Memory: 30.9M
      CPU: 86ms
   CGroup: /system.slice/proxysql.service
           ├─12355 proxysql -c /etc/proxysql.cnf -D /var/lib/proxysql
           └─12356 proxysql -c /etc/proxysql.cnf -D /var/lib/proxysql
To set the administrator password in ProxySQL, we’ll connect to that configuration database and update the appropriate variables.
First, access the administration interface. You’ll be prompted for a password which, on a default installation, is admin.
mysql -u admin -p -h 127.0.0.1 -P 6032 --prompt='ProxySQLAdmin> '
ProxySQL uses port 6032 , make sure you add port 6032 to allow list of UFW on each of the node on both the sites.
UPDATE global_variables SET variable_value='admin:password' WHERE variable_name='admin-admin_credentials';
Query OK, 1 row affected (0.00 sec)
- memory, which is altered when making modifications from the command-line interface.
- runtime, which is used by ProxySQL as the effective configuration.
- disk, which is used to make a configuration persist across restarts.
LOAD ADMIN VARIABLES TO RUNTIME;
SAVE ADMIN VARIABLES TO DISK;
Connecting 2 sites database server galera clusters
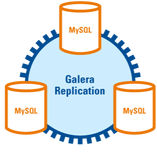
We achieve this by doing my setting up Master to Master Replication between two nodes of MariaDB servers of each site.
Instead of specifying another site MariaDB IP address, you specify the IP address and port of the server running ProxySQL. (Normally in master to master replication we connect two instances by specifying their node IPs but here we specify ProxySQL) ProxySQL further takes the request to the MariaDB Galera cluster which replicates the information to each Galera node.
CREATE USER 'replicator' IDENTIFIED BY 'replicate123';
GRANT ALL PRIVILEGES ON *.* TO ‘replicator’@‘10.8.0.3’ IDENTIFIED BY ‘replicate123’ WITH GRANT OPTION;
Then on node 1 of Site B in the MySQL client run:
GRANT ALL PRIVILEGES ON *.* TO ‘replicator’@‘10.8.0.5’ IDENTIFIED BY ‘replicate123’ WITH GRANT OPTION;
show master status;
MariaDB [(none)]> show master status\G
*************************** 1. row ***************************
            File: mysql-bin.000003
        Position: 747436
MariaDB [(none)]> show master status\G
*************************** 1. row ***************************
            File: mariadb-bin.000005
        Position: 3201952
MariaDB [(none)]> stop slave;
MariaDB [(none)]> CHANGE MASTER TO MASTER_HOST = ‘10.8.0.5’, ‘MASTER_USER’=‘replicator’, ‘MASTER_PASSWORD’=‘replicate123’, MASTER_LOG_FILE=‘mariadb-bin.000005’, MASTER_LOG_POS= 3201952;
MariaDB [(none)]> CHANGE MASTER TO MASTER_HOST = ‘10.8.0.3’, ‘MASTER_USER’=‘replicator’, ‘MASTER_PASSWORD’=‘replicate123’, MASTER_LOG_FILE=‘mysql-bin.000003’, MASTER_LOG_POS=747436;
MariaDB [(none)]> start slave;
MariaDB [(none)]> show slave status\G
*************************** 1. row ***************************
               Slave_IO_State: Waiting for master to send event
                  Master_Host: 10.8.0.5
                  Master_User: replicator
                  Master_Port: 3306
                Connect_Retry: 60
              Master_Log_File: mysql-bin.000003
          Read_Master_Log_Pos: 1175781
               Relay_Log_File: mysqld-relay-bin.000010
                Relay_Log_Pos: 922870
        Relay_Master_Log_File: mysql-bin.000003
             Slave_IO_Running: Yes
            Slave_SQL_Running: Yes
                   Last_Errno: 0
                   Last_Error:
                 Skip_Counter: 0
Setup HAProxy to load balance web servers
sudo apt install haproxy -y
# And ensure the haproxy daemon service is running by running the systemd command.
sudo systemctl status haproxy
Although load balancing Galera cluster too can be done through HAProxy, ProxySQL gave me fine control. With HAProxy we will load balance Apache2 and Redis Sentinel. Configuring HAProxy is quite easy.
Lets configure HAProxy for Apache2
DOMAIN='my.cloud.com' sudo -E bash -c 'cat /etc/letsencrypt/live/$DOMAIN/fullchain.pem /etc/letsencrypt/live/$DOMAIN/privkey.pem > /etc/haproxy/certs/$DOMAIN.pem'
Add redis server IP to HAProxy
sudo systemctl reload haproxy
Setup PHP Session sharing
sudo vi /etc/php/7.4/apache2/php.ini
# or
sudo vi /etc/php/7.4/fpm/php.ini
session.save_handler = redis
session.save_path = "tcp://192.168.1.3:3679?auth=yourverycomplexpasswordhere"

Click image to join the signal group to discuss or ask questions
|

Scan QR Code to join the Signal group.
|
 RSS Feed


